A big thank you to all who rallied together at the VideoDJConference and helped make an Adobe break out session possible. I decided to post some of the topics we covered here and wanted to break things in to digestible pieces. In the first post I wanted to cover two key settings that I use. The example screen shots are CS5.5 (only because I’ve been too busy to install the new version). These setting should work in other versions as well.
Import
Organization
The import and sequence stage is one of the most critical points in the process since Premiere is a little less forgiving later in the process. First. ORGANIZE. I can’t say it enough. If you practice good habits early you won’t be plagued with the missing media issues when you need to re-edit that project a few months later. I personally create a project folder that will house everything I need. Within that folder I create an “Assets” and “Render” folder. The Assets folder is where I place my audio and video source files. The Render folder is simply there so that when I render out my project, I don’t have to go looking for my output. The only exception to the Assets folder rule is when I know I have shared bumpers or source files. But if you can spare the disk space, I say drop it in the project specific Assets folder.
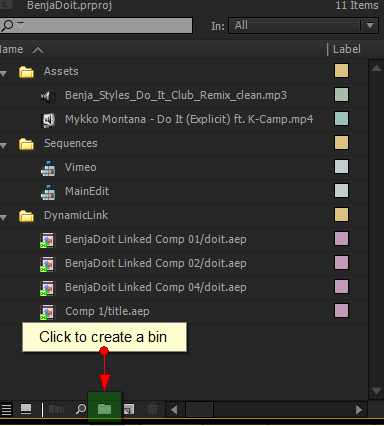
The same organization ideas should carry into your actual project browser. I always create a Assets bin, Titles bin, Color Mattes bin (if using), and a Sequences bin. This helps me keep my workspace clean and know where to go to grab my files. If I end up doing any After Effects linking, I’ll usually create a DynamicLink bin as well. But this is up to you. It has no bearing on the output, only your own workflow sanity.
Creating Sequences
When you create a sequence, pay close attention to your sources. In VJ video editing, there are really 2 source considerations; video & audio. Obviously your video generally will have it’s own audio but in the VJ remix arena, you need to make sure your audio is top notch which often means replacing with a higher-quality, better mastered file. Mostly you will probably work with a consistent size and frame rate and they will probably match the industry-standard settings. But from time to time, you will have to make some decisions (which I’ll give thoughts on in a moment).
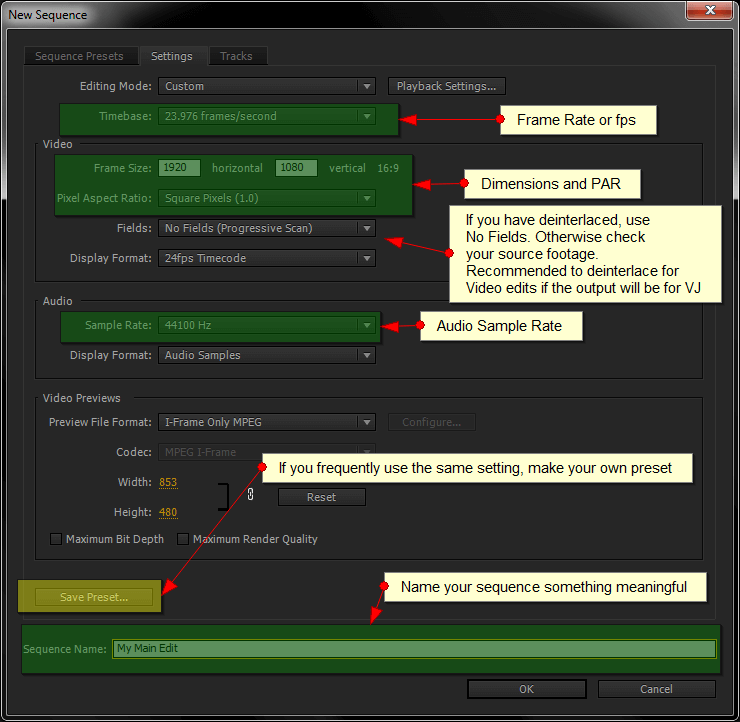
- Frame Rate and Interlacing – Look at your video sources and determine the frame rate. If you are NTSC you are usually going to have sources at 29.97 or 23.976. If you have ripped the video from a promo video DVD or movie, etc,. you should first deinterlace and properly get to the original frame rate. I won’t go into that here (at least now) since there are so many tutorials on the web. If you in the rest of the world, you are probably PAL which is 25 fps. It’s important to understand what you have frame rate and work within the proper frame rate in the sequence. Note: Premiere is really good about letting you mix and match but if you are doing frame accurate editing, you want things as clean as possible.
- Dimensions – This one can be tricky and it doesn’t have to be. certainly want to take note if your Pixel Aspect Ratio (PAR) is 1.0 or some other common ones. Usually you can work with square PAR files which makes the math straight forward. I usually take care of this when I deinterlace and prep. But I’ve seen people take and set a video to 0.9091 or 1.2121 PARs with their desired sizing (say 640×360) and wonder why their video is squished or stretched. For this example, we’ll assume all your PARs are the same at 1.0. This means every pixel is square so your specified dimensions are what they are. So if you want to work in 1920×1080, you can define it as such with square pixels. (Note HDV format of a 1080i source usually is 1440×1080 with a 1.333 PAR. The resulting display is 1920×1080 but if you accidentally set as square pixels you would end up with a 4:3 image).
- Audio Sample Rate – This particular setting should be the same as your primary or final audio. This should be 44100 or 48000 depending on the source but take note and you’ll set your projects to that setting.
Sometimes you mix and match media that is different sizes. I personally like to work where there is the most consistency and I have to do less scaling. Remember, scaling up looks worse than scaling down. But if all you have is one 640×360 clip in a sea of 1280×720, it may be better to scale up that 1 clip.
After taking all these into consideration you can now create your sequence.
~RANT warning ~
If your video is 640×360, it’s not going to be better at a larger size unless you are using some specific tools. It’s like blowing up a jpeg to edit in photoshop. It’s not going to be better so just work with it at it’s native resolution
~ Done ranting ~
You can create a new sequence by:
- Choosing File -> New -> sequence from the menu
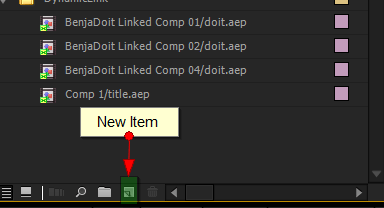
- Clicking on the New Item button -> Sequence on the project browser
- Dragging a video clip that matches all your settings to the New Item button in the project browser. (Pay attention to all you settings and make sure they match since you can’t change it later)
For methods 1 & 2 you will get a New Sequence dialog. Method 3 just creates it appropriately.
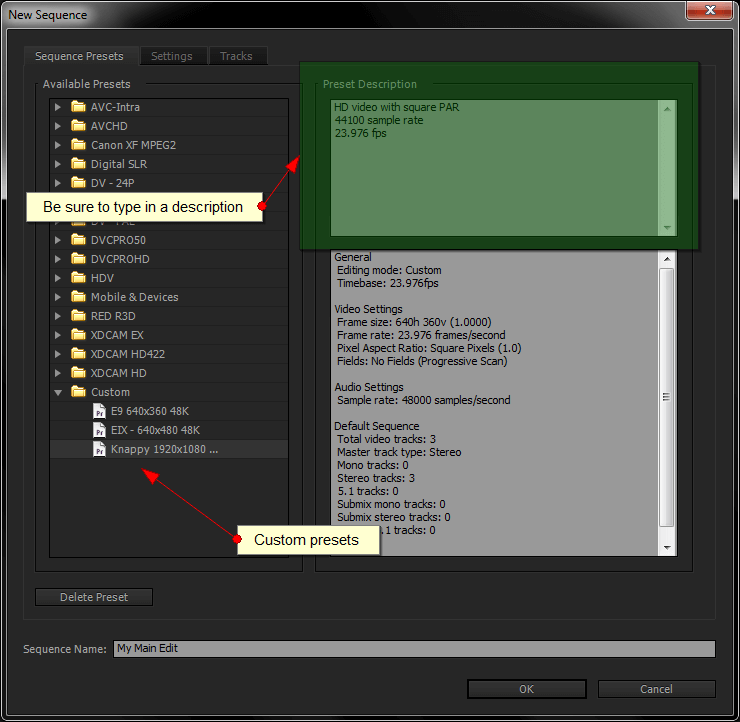
In the New Sequence dialog you can choose from many presets. I highly recommend choosing the Settings tab and setting up based on the information you’ve determine earlier. In this screenshot example, I’m working with a final audio file that is 44100 and video that is 1920×1080 square pixels. The audio in the source video file is 48000 but since that’s not our final, I want to ensure the proper Sample Rate is used.
I always recommend naming your sequence to something meaningful and if you consistently work with the same types of settings, go ahead and create your own preset. This will make it easier to load your own settings each time. I frequently do work with 640×480 and 640×360 so I have my own settings in the Sequence Presets tab of the New Sequence dialog. Be sure to name the preset something meaningful too.
Exporting
We’re going to skip the editing details in this article and just jump to exporting. I’ll cover some techniques in upcoming posts.
The most important step for exporting is determining your target output. Some folks will use the built-in Media Encoder to render for use in Virtual DJ or Serato. Some folks will decide they have other workflows to export uncompressed renders and use other tools to compress to the final output with tools like Sorenson squeeze. Let me talk about my preferences for each of these approaches. In both examples I’m going to assume that are target is a VJ application and not a broadcast TV destination. This will make it easier since most VJs who are editing are going to either use it themselves or make it available to other VJs to use in the aforementioned VJ software or are going to publish on a video site such as Vimeo or YouTube.
Adobe Media Encoder
The default Adobe Media Encoder (AME) is quite powerful in many aspects. I’ll cover more detailed uses in future articles. For this example I want to use the built in encoder to export to an h.264 output for a VJ. There are several settings I have created and use depending on the final video dimensions to get the best balance between video quality and over working my laptop at a show. There is nothing worse than your display freezing as Serato stops updating the display while it writes to the file you just unloaded. I have had a lot of success using the default encoder as part of my workflow.
One note of caution, don’t render a 4:3 video at 16:9 on output. That’s just ugly. If it’s 4:3, output as 4:3 or do some clever cropping PRIOR to your render. (article coming soon).
Select the sequence you are exporting and choose File-> Export->Media from the menu (or Ctrl+M on widows). This will launch a new dialog to set your export settings.
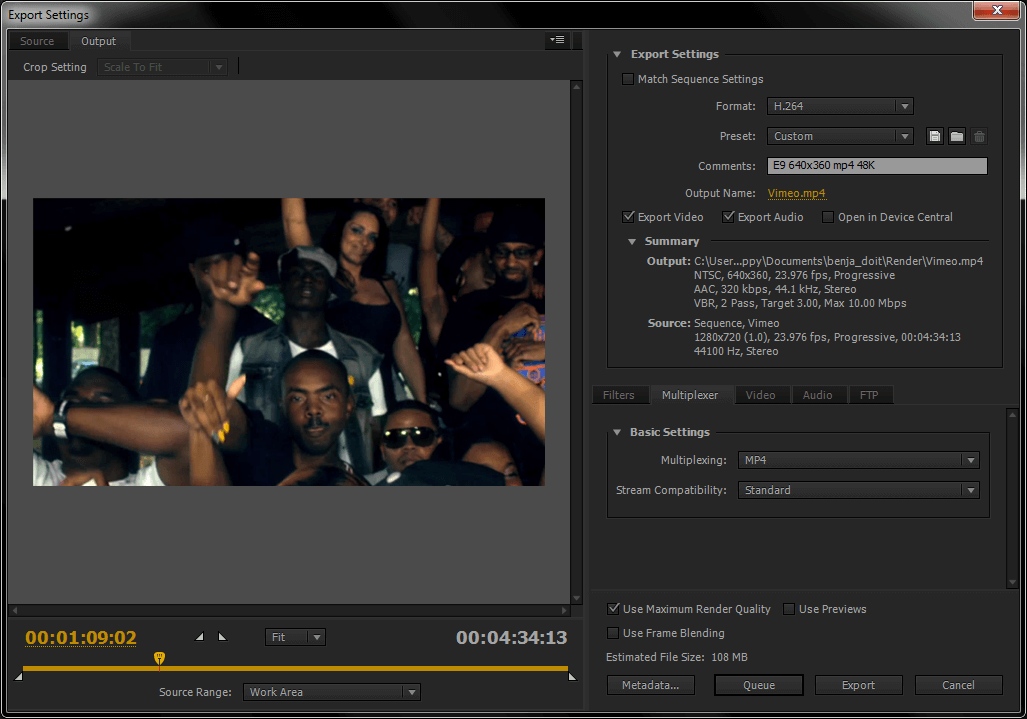
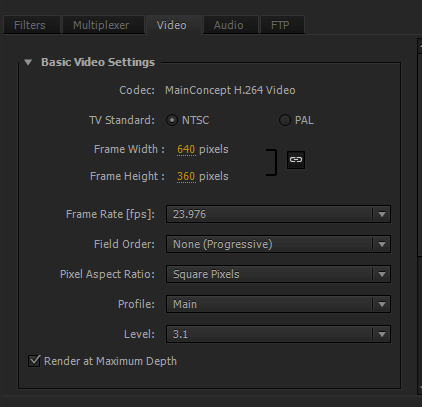
If I’m doing a typical 640×360 or 640×480 output, the settings seem to be pretty close except for the video size. These settings work well for me for typical VJ rendering. Here is my main settings in this situation:
- Format: H.264
- Don’t worry about the preset unless you have created ones you use regularly or plan on using a specific target.
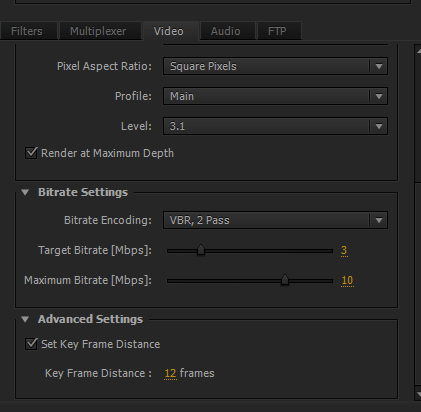
Video Tab:
Note: I find the VBR 2 pass works well for me at this rate and I like to have keyframes every 12 frames.
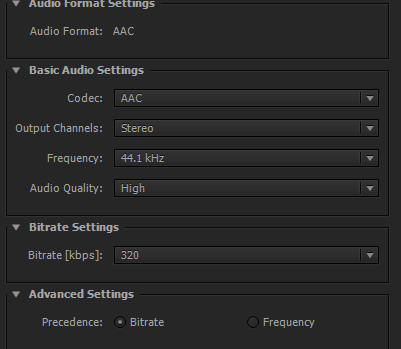
Audio Tab:
Make sure you set the name of the output and the path to a location. I stressed this because I’ve rendered using only to find myself searching for the file later….my earlier plea for organization.
At this point you should have a nice mp4 that you can tag and use for your VJ software. When I render bigger video sizes, I tend to increase the bitrate to something slightly higher (say 3.5 Target bitrate and maximum at 11) But this is really working on balance and your ultimate output. I recommend playing with the bitrate to see what yields the best result for you. Additionally, if you are rendering for certain internet sites like Vimeo or YouTube, don’t be afraid to try the presets for that target destination. That may even work better and require less re-encoding time after you’ve uploaded.
Uncompressed Video
Rendering an uncompressed video for compression in another application has it’s value. I find that most of the batch tasks can still be achieved with the built in MCE but other are accustomed to different tools. Each format you will need to set your output settings like size, frame rate etc. Settings are fairly similar except when choosing the format. This decision can be based on platform and sometimes even personal preference to a format. Here are some of my favorite uncompressed (or low amount of loss) formats I work with.
- Format: QuickTime, Video Codec: Animation – This is the best of the uncompressed IMHO but will result in a LARGE file. This is really strong because you can retain transparency if you plan on using your output in another composition where transparency is needed.
- Format: QuickTime, Video Codec: PhotoJPEG – This is not lossless but the quality is very good which save you some disk space. I like to do quality at 95% and the perceived quality is pretty much the same but that does depend on the content.
- Format: Microsoft AVI, Video Codec: Lagarith Lossless Codec – I was introduced to this one about a year ago and it provides a nice lossless output at a decent file size. just be sure your color space matches. i find most of mine are in the YV12 mode. Changing something TO RGB just makes it bigger than needed.
- Format: Microsoft AVI, Video Codec:None -Like Animation above you will get a LARGE file. There’s no transparency. Not one of my favorites, but available.
Since this really depends on the downstream tools, you can try different codecs. Adobe support a great number of codecs and I find that 99% of my work is probably only using 2% of the available ones. In all cases just be sure to set the appropriate video setting like pixel aspect ratio and size.
Conclusion
I plan on adding more posts based on different topics we covered in Vegas and even additional ones that could be helpful tips/tricks. If you run into any challenges with the information I have provided here or even have some better suggestions, hit me up. We can always update to share the knowledge. If you like this information and want more, let me know.




Thank you so much Knappy, we all appreciate it!
Great post. I was checking constantly this blog and I’m inspired!
Extremely helpful info particularly the ultimate part 🙂 I
handle such information a lot. I used to be looking
for this particular info for a long time. Thanks and good luck.